


Dealing with a leaking asphalt shingle roof can be one of the most frustrating and stressful experiences for any homeowner. Water stains on your ceiling, peeling paint, and that unmistakable drip-drip sound during a rainstorm all point to one thing — your roof has been compromised. Whether you are facing a small pinpoint leak or a more widespread water intrusion issue, understanding asphalt shingle roof leak repair is essential to protecting your home’s structural integrity and preventing costly damage down the road. In this comprehensive guide, we walk you through everything from identifying the root cause to executing a reliable repair that stands the test of time.
Understanding Asphalt Shingle Roof Leaks and Their Root Causes
Before you grab a ladder and start patching, it is crucial to understand why asphalt shingle roofs leak in the first place. Asphalt shingles are among the most popular roofing materials in North America because of their affordability, durability, and ease of installation. However, they are not immune to damage. Over time, exposure to UV rays, wind, hail, and thermal cycling degrades the shingles and their sealant, creating vulnerabilities where water can infiltrate.
Common Causes of Asphalt Shingle Roof Leaks
Several factors contribute to asphalt shingle roof leaks, and identifying the specific cause is the first step toward a lasting repair:
- Age-related deterioration — Asphalt shingles typically last 20 to 30 years, but they begin losing their protective granules and sealing capacity well before the end of their lifespan.
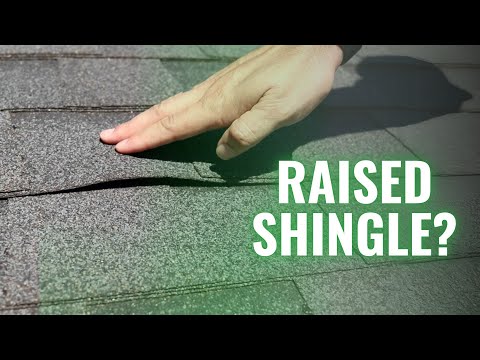
- Damaged or missing shingles — Wind gusts, falling branches, and foot traffic can crack, curl, or completely remove individual shingles, exposing the underlayment and deck.
- Flashing failure — The metal flashing around chimneys, vents, skylights, and valleys is a common leak point when it corrodes, loosens, or was improperly installed.
- Broken or deteriorated underlayment — Even if the shingles look intact, a compromised felt or synthetic underlayment can allow water to seep through.
- Poor roof ventilation — Trapped heat and moisture accelerate shingle degradation and can cause ice dams in colder climates, both of which lead to leaks.
- Ice dam formation — In winter, melting snow refreezes at the roof’s edge, creating a dam that forces water under shingles and into your home.
- Improper nail placement — Nails driven too high, too low, or off-center fail to secure shingles properly, leaving gaps for water entry.
How to Identify the Exact Source of Your Roof Leak
One of the biggest mistakes homeowners make is fixing the wrong spot. Water travels along rafters, sheathing, and insulation before appearing on your ceiling, so the leak entry point is often far from where the stain shows up indoors. Accurately locating the source is critical to an effective asphalt shingle roof leak repair.
Interior Signs vs. Exterior Signs
Interior signs include water stains on ceilings or walls, peeling wallpaper or paint, damp insulation in the attic, and visible mold or mildew growth. Exterior signs include cracked, curled, or cupped shingles, granule loss in gutters, lifted or warped shingles, rusted or loose flashing, and cracked sealant around roof penetrations.
For a thorough inspection, start in the attic during daylight with a flashlight. Look for daylight penetrating through the roof deck, dark streaks, or wet spots on the plywood. On the exterior, walk the roof carefully and check every shingle, every seam, and every flashing connection. Mark suspect areas with chalk so you can reference them from the ground.
Tools and Materials Needed for Asphalt Shingle Roof Leak Repair
Having the right tools and materials on hand before you begin makes the repair process faster, safer, and more effective. Here is what you will typically need:
- Roofing cement or asphalt-based sealant
- Replacement asphalt shingles (match the color and style)
- Galvanized roofing nails or cap nails
- Hammer or nail gun
- Pry bar or flat bar for removing damaged shingles
- Utility knife or roofing knife
- Wire brush for cleaning surfaces
- Roofing tar or epoxy patch for larger holes
- Flashing material if flashing is the source
- Safety harness, roof harness anchor, and sturdy ladder
- Chalk or marker for marking repair areas
Step-by-Step Asphalt Shingle Roof Leak Repair Guide
Follow this systematic approach to repair your leaking asphalt shingle roof efficiently and safely.
- Safety first. Always wear a safety harness anchored to a roof anchor point. Work on a dry, calm day with no wind or rain. Non-slip shoes with good traction are a must.
- Locate the leak source. Use the interior and exterior inspection methods described above to pinpoint the exact area.
- Remove damaged shingles. Use the pry bar to gently lift and remove the damaged shingles above the leak area. Slide the flat bar under the nail heads of the shingle above and carefully pry it free.
- Inspect the underlying layers. Check the underlayment and roof deck for additional damage. Replace any rotten or warped plywood sections before proceeding.
- Apply roofing cement. For minor cracks or small holes, apply a generous layer of roofing cement directly over the damaged area, spreading it well beyond the compromised spot.
- Replace shingles if needed. Slide the new shingle into position, align it with surrounding shingles, and nail it down with galvanized roofing nails placed just below the adhesive strip.
- Seal the repair. Apply a second bead of roofing cement along the edges of the new shingle and over the nail heads to create a watertight seal.
- Check flashing repairs. If the leak is near a chimney or vent, replace or reseal the flashing. Use high-quality roofing cement or a specialized metal-to-shingle sealant.
- Inspect your work. After the cement cures (typically 24 to 48 hours), simulate rainfall with a garden hose to verify the repair holds.
Repairing Minor Leaks: Quick Patch Methods

For small leaks caused by a single cracked shingle or a tiny puncture, a quick-patch approach works well. Clean the damaged area with a wire brush, apply roofing cement generously, and press a piece of roofing fabric or a shingle scrap over the crack. Seal the patch with another layer of cement on top. This method is ideal for temporary fixes or minor damage discovered early.
Fixing More Serious Damage: Full Section Replacement
When multiple shingles are damaged or the roof deck is compromised, a more involved approach is required. Cut out the damaged section of the roof deck, install a new plywood patch secured with construction adhesive and deck screws, lay fresh underlayment over the patch, and then install matching replacement shingles. This method ensures long-term durability and a proper water-tight seal.
DIY Asphalt Shingle Roof Repair vs. Professional Roofing Repair
Not every asphalt shingle roof leak repair should be tackled as a DIY project. Understanding when to call a licensed roofing contractor can save you from costly mistakes and safety hazards.
| Factor | DIY Repair | Professional Repair |
| Cost | Lower (materials only) | Higher (labor + materials) |
| Skill Level | Intermediate to advanced | Expert |
| Time Required | 1 to 4 hours for minor repairs | Half a day to full day |
| Warranty Coverage | None typically | Often includes a work warranty |
| Safety Risk | Higher without proper equipment | Minimized with professional gear |
| Best For | Small leaks, 1-3 damaged shingles | Extensive damage, structural issues |
| Longevity of Repair | Variable; depends on skill level | High; typically guaranteed |
As a rule of thumb, if the leak covers more than a small area, involves structural deck damage, or requires full flashing replacement, hiring a professional roofing contractor is the smarter investment. For isolated, minor leaks, a confident DIYer can save significant money with the right approach and precautions.
Preventing Future Asphalt Shingle Roof Leaks
Prevention is always more cost-effective than repair. Here are expert-recommended strategies to keep your asphalt shingle roof leak-free for years to come:
- Schedule biannual roof inspections — spring and fall are ideal times to check for loose shingles, damaged flashing, and clogged gutters.
- Keep gutters and downspouts clear — debris buildup causes water to back up under shingles and along the fascia.
- Trim overhanging tree branches — branches scrape shingles and deposit debris that traps moisture.
- Ensure proper attic ventilation — balanced intake and exhaust vents prevent heat buildup and moisture accumulation that degrade shingles from below.
- Address minor damage immediately — a single cracked shingle can escalate into a major leak within weeks if left unrepaired.
- Apply a roof sealant — a quality roof coating adds an extra layer of UV and water protection to aging asphalt shingles.
- Remove ice dams promptly — use a roof rake or calcium chloride to prevent ice dam damage during winter months.
Frequently Asked Questions About Asphalt Shingle Roof Leak Repair
Q: How much does it cost to repair an asphalt shingle roof leak?
A: The cost of asphalt shingle roof leak repair typically ranges from $150 to $400 for minor fixes, and $500 to $2,000 or more for extensive damage requiring deck replacement or multiple shingle repairs. Factors like roof pitch, accessibility, local labor rates, and the extent of damage all influence the final price.
Q: Can you repair a leaking asphalt shingle roof from the inside?
A: While interior patches can temporarily stop active dripping, they are not a permanent solution. Water travels along structural members, so the entry point is almost always on the roof surface or at the flashing. Exterior repairs are essential for a lasting fix.
Q: How long does an asphalt shingle roof leak repair typically last?
A: A properly executed asphalt shingle roof leak repair using quality materials and correct techniques can last anywhere from 5 to 15 years or more, depending on the extent of the original damage, local weather conditions, and the age of the existing roof system.
Q: What is the best sealant for repairing asphalt shingle leaks?
A: Asphalt-based roofing cement and polyurethane roofing sealants are the most effective options. Look for products that are UV-resistant, flexible when cured, and designed specifically for asphalt roofing surfaces to ensure a strong, durable bond.
Q: Should I replace the entire roof if I have a leak?
A: Not necessarily. A single leak does not always mean full roof replacement. However, if your roof is over 20 years old and you are experiencing multiple leaks, widespread shingle deterioration, or significant granule loss, a complete asphalt shingle roof replacement may be the most cost-effective long-term solution.
Final Thoughts on Asphalt Shingle Roof Leak Repair
Successfully completing an asphalt shingle roof leak repair requires patience, the right materials, and a methodical approach. Whether you are patching a small crack or replacing an entire section of damaged shingles, the key is addressing the problem promptly before it escalates into structural water damage, mold growth, or insulation failure. By following the step-by-step guidelines outlined in this article and taking proactive measures to maintain your roof, you can extend the life of your asphalt shingle roofing system and keep your home dry and secure for years to come. When in doubt, always consult a qualified roofing professional to assess the damage and recommend the best course of action for your specific situation.