Every homeowner will eventually face a plumbing issue that makes them question whether they should call a professional or tackle it themselves. The truth is, DIY plumbing tips and tricks can save you hundreds of dollars in service fees while giving you confidence every time a sink clogs or a pipe leaks. Whether you are a complete beginner or someone who has already replaced a few fixtures, understanding the fundamentals of residential plumbing can transform the way you maintain your home. This comprehensive guide walks you through beginner-friendly fixes, intermediate projects, and advanced techniques that real homeowners use every day. By the end, you will have a clear roadmap for handling almost any household plumbing challenge with skill and precision.
Why DIY Plumbing Saves You Money and Time
Hiring a licensed plumber for every minor issue can drain your wallet faster than you might expect. The average service call costs between $150 and $300, and that does not include the cost of parts or labor for larger repairs. When you learn essential plumbing tips for homeowners, you take control of your maintenance budget and reduce dependency on external help. Beyond cost savings, knowing basic plumbing techniques means you can address problems immediately rather than waiting days for an appointment. Water damage from a slow leak can escalate quickly, so having the knowledge to stop it fast is invaluable. Understanding your home’s plumbing system also helps you spot warning signs early, preventing expensive emergency repairs down the road.
Essential Tools Every Homeowner Should Own
Before diving into any plumbing project, having the right tools on hand makes all the difference. You do not need an expensive workshop; a well-stocked toolkit covers most residential plumbing tasks. Here is what every homeowner should keep in their garage or utility closet:
- Adjustable wrench (two sizes preferred)
- Plunger (cup-style and flange-style)
- Plumber’s tape (Teflon tape)
- Pipe cutter for copper and PVC
- Plumber’s putty and silicone sealant
- Basin wrench for tight spaces
- Drain snake or auger
- Bucket and towels for water catchment
- Flashlight or headlamp for dark crawl spaces
- Plumbing torch and solder for advanced work
Investing in quality tools from the start ensures durability and makes each job faster and safer. A good plumber’s tape alone can prevent dozens of small leaks, and a sturdy drain snake handles most clogs without chemical cleaners.
Beginner DIY Plumbing Tips and Tricks
Fixing a Leaky Faucet Without Replacing the Whole Unit
A dripping faucet is one of the most common household complaints, yet it is also one of the simplest repairs to perform. Start by shutting off the water supply valves beneath the sink. Next, remove the handle screw and gently pull the handle off. Depending on your faucet type, you will find either a cartridge, a ball assembly, or ceramic discs inside. Most leaks stem from a worn-out rubber washer or O-ring. Replace the damaged component with an exact match from your local hardware store, reassemble the faucet, and turn the water back on. This simple fix stops wasted water and reduces your utility bill noticeably.
Unclogging Drains Naturally Without Harsh Chemicals
Chemical drain cleaners may seem convenient, but they can corrode your pipes over time, especially in older homes with galvanized steel or PVC plumbing. Instead, try these natural drain cleaning tricks that professionals recommend:
- Pour half a cup of baking soda directly into the drain.
- Follow it with one cup of white vinegar and let it sit for thirty minutes.
- Flush the mixture with a kettle of boiling water.
- For stubborn clogs, use a manual drain snake to physically remove the blockage.
This method works on kitchen grease buildup, hair clogs, and soap residue without damaging your pipes or releasing toxic fumes into your home.
Intermediate Plumbing Projects You Can Handle
Replacing a Shower Head for Better Water Flow
Upgrading your shower head is a straightforward project that dramatically improves your daily shower experience. Start by unscrewing the old shower arm fitting by hand or with an adjustable wrench, using a cloth to protect the chrome finish. Clean the threads on the shower arm and wrap them with Teflon plumbing tape in a clockwise direction — about five to seven wraps should create a watertight seal. Thread the new shower head onto the arm and tighten it by hand, then give it a quarter turn with the wrench. This project takes less than fifteen minutes and instantly upgrades your bathroom’s look and water pressure.
Installing a New Sink Faucet Step by Step
A new faucet can modernize an outdated kitchen or bathroom in under an hour. Begin by turning off both hot and cold supply valves. Disconnect the water lines using a basin wrench, then remove the mounting nuts beneath the sink. Clean the surface thoroughly before setting the new faucet in place according to the manufacturer’s instructions. Secure the mounting plate, connect the supply lines, and turn the valves back on slowly. Check every connection for drips and tighten as needed. This intermediate project builds confidence and gives you hands-on experience with supply line connections and valve operation.
Advanced DIY Plumbing Techniques

Soldering Copper Pipes Like a Pro
Soldering copper pipe joints is a skill that elevates your DIY plumbing abilities significantly. You will need a propane torch, lead-free solder, flux paste, a pipe cutter, and sandpaper or a wire brush. Begin by cutting the pipe cleanly and deburring the inside edge. Clean both the pipe and the fitting exterior with sandpaper, then apply a thin layer of flux to each surface. Slide the fitting onto the pipe and heat the joint evenly with your torch. Touch the solder to the joint — it should melt and wick into the gap through capillary action. Wipe away excess solder with a damp cloth while it is still warm. Always have a fire extinguisher nearby and work on a heat-resistant surface. Mastering soldering opens the door to repairing or adding new pipe runs throughout your home.

Dealing with Low Water Pressure Throughout the House
Low water pressure frustrates homeowners and often signals an underlying issue that DIY methods can resolve. Start by checking the pressure regulator on your main water line — a standard home should read between 40 and 60 PSI. If the regulator is faulty, replacing it is a relatively simple task. Next, inspect your faucet aerators and shower heads for mineral buildup. Soaking them in white vinegar overnight dissolves calcium and lime deposits that restrict flow. If the problem persists, check for partially closed valves, hidden leaks, or corroded galvanized pipes that may need replacement. Addressing low water pressure early prevents further damage to your fixtures and appliances.
Comparison Table: Common Plumbing Problems and DIY Solutions
| Problem | Likely Cause | DIY Fix Difficulty | Recommended Tool |
| Leaky faucet | Worn washer or O-ring | Beginner | Adjustable wrench, replacement parts |
| Clogged kitchen drain | Grease and food buildup | Beginner | Plunger, baking soda, vinegar |
| Running toilet | Faulty flapper or fill valve | Beginner | Replacement flapper kit |
| Low shower pressure | Mineral buildup in aerator | Beginner | Vinegar soak, wrench |
| Leaking pipe joint | Degraded seal or loose connection | Intermediate | Plumber’s tape, pipe wrench |
| Water heater no hot water | Tripped breaker or faulty thermostat | Intermediate | Multimeter, screwdriver |
| Copper pipe leak | Corrosion or joint failure | Advanced | Propane torch, solder, pipe cutter |
| Sewer line blockage | Tree root intrusion or grease | Advanced | Electric drain auger |
Expert Tips for Long-Lasting Plumbing Results
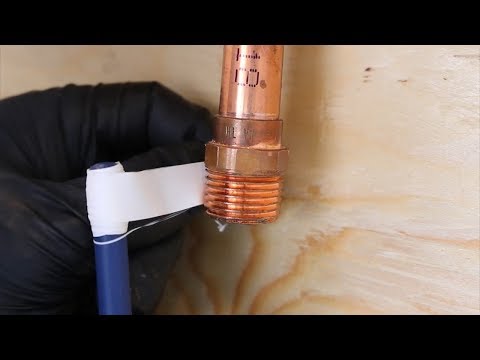
Even the best repair will not last if you skip preventive maintenance. Professionals follow a few rules that keep plumbing systems running smoothly for decades. Always use plumber’s tape on threaded connections — it creates a reliable seal and prevents slow leaks that cause water damage over time. Never overtighten fittings, as this can crack plastic threads or strip metal ones. When working under sinks, place a bucket directly beneath the job area to catch residual water and avoid costly cleanup. Label your water shut-off valves so every household member knows where they are and how to use them in an emergency. Finally, flush your water heater annually by draining two to three gallons from the bottom valve to remove sediment buildup that reduces efficiency and shortens the unit’s lifespan.
One of the most overlooked DIY plumbing maintenance tips is inspecting exposed pipes for signs of condensation, corrosion, or moisture. Catching a small problem early prevents it from becoming a full-blown emergency. Keep a small log of every repair you perform, including dates and part numbers, so future troubleshooting becomes faster and more accurate.
Frequently Asked Questions
What are the best DIY plumbing tips for beginners who have never fixed anything before?
Start with simple tasks like replacing a faucet washer or plunging a clogged drain. Watch detailed video tutorials specific to your fixture model, gather your tools beforehand, and always shut off the water supply before starting any repair. Practicing on small fixes builds the confidence and skill needed for more complex projects.
How can I prevent frozen pipes during winter without calling a professional?
Insulate exposed pipes in unheated areas using foam pipe sleeves, keep cabinet doors open under sinks to allow warm air circulation, and let faucets drip slightly during extreme cold snaps. If you suspect a pipe is frozen, apply warm towels or a hair dryer to the affected section — never use an open flame.
What is the safest way to unclog a toilet without damaging the bowl or pipes?
Use a quality flange plunger and create a tight seal over the drain hole. Pump gently and steadily for twenty to thirty seconds, then pull the plunger up quickly to break the clog. Repeat if necessary. Avoid chemical drain cleaners, as they can erode porcelain and rubber seals inside the toilet.
How do I know whether a plumbing leak requires professional help or a DIY fix?
If the leak is small and accessible, such as a dripping faucet or a loose connection, DIY repair is usually safe and effective. However, leaks behind walls, slab leaks, or issues involving main water line connections should be left to licensed professionals to prevent structural damage and code violations.
Can DIY plumbing repairs actually increase my home’s value?
Absolutely. Well-maintained plumbing systems are a major selling point for home inspectors and buyers alike. Documented DIY repairs, especially those involving updated fixtures, improved water pressure, or leak-free connections, signal to potential buyers that the home has been cared for and is less likely to have hidden plumbing problems.
Final Thoughts on Mastering DIY Plumbing Tips and Tricks
Learning DIY plumbing tips and tricks is one of the most rewarding investments a homeowner can make. From fixing a simple leaky faucet to soldering copper pipes and diagnosing low water pressure, each skill you develop saves money, prevents emergencies, and gives you a deeper understanding of how your home works. Start small, build your confidence gradually, and always prioritize safety by shutting off water supplies before any repair. Keep your toolkit organized, maintain your plumbing system regularly, and do not hesitate to consult professional resources when a project exceeds your comfort zone. With patience and practice, you will handle the vast majority of household plumbing issues efficiently and effectively — and you will wonder why you ever paid someone else to do it.